
Your cart is currently empty!
How to Add Bleed in Canva: A Step-by-Step Guide
Creating professional-quality designs often requires precise attention to detail, especially when it comes to printing. One crucial aspect of print design is adding bleed to ensure your designs look perfect when trimmed. In this guide, I’ll walk you through the process of adding bleed in Canva, a popular online design tool that’s user-friendly and versatile.
What is Bleed and Why is it Important?
Bleed refers to the area of a design that extends beyond the final trim size. This extra space ensures that there are no white borders or unprinted edges on your finished product, providing a polished and professional look. Bleed is particularly important for designs like business cards, flyers, posters, and brochures…
Step-by-Step Guide to How to Add Bleed in Canva
Step 1: Log into Canva and Open Your Design in Canva
Log in to Canva: If you don’t already have a Canva account, sign up for free and log in.
Create New or Open an already existing Design: Click on the “Create a design” button and choose your project you want to work on (e.g., flyer, business card, poster).
Step 2: Set Up Your Document with Bleed
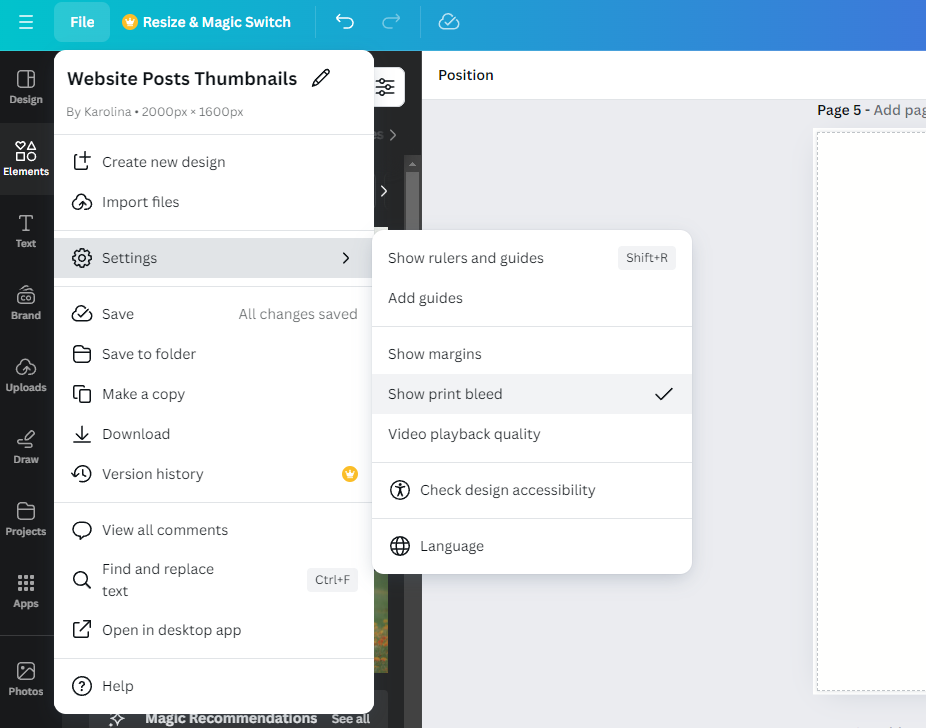
- Enable Bleed: In the Canva editor, click on “File” in the top-left corner, go to “Settings” then select “Show print bleed.” This will display the bleed area as a dashed line around your design. Canva automatically adds a 0.125-inch bleed to each side of your design.
Step 3: Design with Bleed in Mind
- Extend Backgrounds and Images: Ensure that background colors or images extend all the way to the outer edge of the bleed area. This prevents any white borders from appearing after trimming.
- Keep Important Elements Inside the Safe Zone: While extending your backgrounds, make sure all important text and images stay within the inner safe zone, away from the bleed area, to avoid them being cut off.
Step 4: Review and Download Your Design
- Double-Check Everything: Before finalizing, review your design to ensure all elements are correctly positioned within the bleed and safe zones.
- Download with Bleed: When you’re ready to download your design, click on the “Download” button in the top-right corner. Select “PDF Print” as your file type, and make sure the “Crop marks and bleed” option is checked. This will include the bleed area in your PDF, making it ready for professional printing.
Tips for Perfect Print Designs
- Use High-Resolution Images: Ensure all images and graphics are high resolution to avoid pixelation in your printed design.
- Consistent Margins: Maintain consistent margins and alignment for a professional look.
- Proofread: Double-check all text for typos and errors before printing.
Conclusion
Adding bleed in Canva is a straightforward process that can significantly enhance the quality of your printed designs. By following these steps, you can ensure your final product looks polished and professional, with no unsightly borders or cut-off elements. Whether you’re designing business cards, flyers, or posters, mastering the use of bleed will take your print projects to the next level.
Start creating with Canva today and see the difference that precise design techniques can make!

Leave a Reply